Tag Archives: food

Recipe: Mulled wine with vanilla

Like mince pies and bread sauce, mulled wine is one of those things that gets relegated to the Christmas season when it should be enjoyed all year round. Nevertheless, while I’ll merrily quaff hot alcoholic drinks at almost any time of the year, I’ll admit that their appeal certainly grows with the onset of winter. Dark days and early nights mean that treats are needed, and this recipe provides exactly that.

The vanilla and the combination of whole spices make this mulled wine very different from what you’d get with the vast majority of pre-made ‘mulling spice’ mixes, and completely unrecognisable from the pre-mulled stuff that you can buy in bottles. The resulting drink is honeyed and rich, with the consistency of a very good sweet sherry; a shiny, syrupy liquid that clings the sides of a glass.

Tips

  • The quality and type of wine you use really does matter. Using bad wine will just result in bad mulled wine. Saying that, there’s no point using a really good quality or expensive wine when you’re going to be changing the flavour quite a lot. My rule of thumb is ‘don’t use anything that you wouldn’t be willing to drink in a pub’. I’ve had the best results using New World Merlot or Cabernet Sauvignon at around the £5 or £6 mark – supermarket own-brand ones are fine. These varieties are generally quite mild and rounded in flavour, so they don’t interfere with the spices, and are very easy to get hold of.
  • Don’t overdo it on the orange juice, or it all gets a bit ‘sangria’.
  • Only use best quality vanilla extract or a vanilla pod here. I swear by Nielsen Massey vanilla extract, which you can buy online, from Lakeland or from certain supermarkets. It is 100% worth the price and will last for ages.
  • The amounts of whole spices given below may seem a bit inexact, but how many you use of each will depend on their size and freshness – you’ll need to use your own judgement here.
  • The recipe is easily halved, doubled, tripled, quadrupled…
  • It’s best not to leave the pan on the heat once you’ve served some of the wine, as it will continue to reduce and may start to stick. If you’d like to serve it over a longer period of time, put a lid on the pan to keep it warm and just reheat it gently when you want some more. For a single batch made using the amounts given below, I use a thermos to keep it hot.

mulled_wine

MULLED WINE WITH VANILLA

Takes: 30 minutes

Makes: 6 small glasses or cups

Ingredients:

  • 1 bottle of red wine, preferably Merlot or Cabernet Sauvignon (see Tips)
  • 100 ml sweet fortified wine (Madeira, sweet sherry, port or a mixture)
  • 100ml smooth orange juice
  • 175g sugar, preferably demerara or muscovado
  • 1.5 tsp best-quality vanilla extract or vanilla bean paste, or 1 vanilla pod (see Tips)
  • 1 bay leaf
  • 7 or 8 cardamom pods, lightly crushed
  • 1 cinnamon stick, broken into halves
  • 5 or 6 whole cloves
  • 4 or 5 juniper berries, lightly crushed
  • 1/4 tsp of freshly-grated nutmeg
  • 1 star anise

Method:

  1. Pour the wine, fortified wine and orange juice into a large pan and bring to a simmer. Don’t let it boil.
  2. Add the spices and vanilla, and simmer for 5 minutes.
  3. Add the sugar and stir.
  4. Simmer gently for 15 to 20 minutes, stirring regularly.
  5. Strain the wine through a sieve, tea strainer or some muslin into another pan or a thermos (see Tips).
Tagged , , , , , , , , , , ,

Culinary volte-faces or: How I learned to shut up and chow down

Like many people, I was a difficult eater as a child. Mostly this was due to a severe intolerance to most artificial colourings and preservatives. I was the kid who had to take their own lunchbox to parties; a fact which still makes me shed a little tear of self-pity. Unnecessarily, I imagine, as I don’t recall it bothering me much at the time.

However, a large part of my fussy eating was due to sheer pigheadedness. There were a ton of things that I just wouldn’t touch, including an entire category called “things that have bits in”. I wasn’t quite in the league of my partner, who I’m told used to pick every single bit of onion out of his spaghetti bolognese. Unlike my poor mum-in-law, my parents at least had the blessing of a gullible child. For years I declared an undying hatred for mushrooms whilst blithely chowing down on tins of mushroom soup, which my mum told me was called “chickmush”. As you can tell, I wasn’t the most perceptive child. The mushroom thing changed, thankfully. I clearly remember walking up to my mum when I was about six and declaring with no preamble whatsoever that “I didn’t used to like mushrooms, but now I do”. Years later, they’re one of my all-time favourite foods.

These culinary volte-faces of mine have happened with many different foods over the years. Here are a few of my favourites:

Gherkins: I vividly recall claiming as a teenager that gherkins were “the second most disgusting food on the planet”. (Dry cat food was first on the list, incidentally. I tried it in order to see if I was missing out on anything. I wasn’t). Now, it’s a completely different story. I will happily munch gherkins straight from the jar, but I also love them in wraps, sandwiches and burgers. They work anywhere that a bit of crunch and vinegary sharpness is needed. Sadly, dry cat food remains disgusting.

Offal (within reason): As a meat-eater, I’m a great believer in the “use every part of an animal” philosophy. If something has died to provide you with a meal, the least you can do is make sure that you don’t waste large parts of its body. This ethos, combined with my interest in butchery, means that I’m not particularly squeamish about offal. Now, anyway. This wasn’t always the case. My first experience of eating offal was the kidney element of supermarket steak and kidney pies, i.e. barely-visible pieces of greyish, chewy matter. This gave me the hubristic notion that I now liked offal. I was utterly horrified when I ordered a steak and kidney pie at a family pub lunch and received something with actual kidneys in it. Now, I’ll happily eat whole kidneys, particularly on toast with a rich sauce, and I’ll cook with other types of offal. I’m afraid I still draw the line at eating something’s brains though, largely because the pattern of brains repulses me.

Shellfish: I’m still working on this one. I have a strong dislike of anything with a shell, and a phobia of one thing in particular (can’t even type the name, but it walks sideways and lives in water). I now love scallops, mussels and prawns, but it took me quite a few years to get to this point. Anything larger, like lobster, I’m still a bit iffy about.

Capers: I used to spend quite some time picking capers out of salads in restaurants. I don’t think I really objected to the flavour; it was more to do with their texture and the way they seem to congregate at the bottom of a bowl, so that all you had left at the end of the dish were capers. This was until I discovered the savage delights of chopping them up, so you get all of their sharp, fresh bitterness without the hassle of chasing them around your plate.

Olives: Olives are the example people always use when talking about foods that people grow to like, for good reason. A lot of people seem to grow up hating them, and eventually come to love them. When I’d make a disgusted face at my dad as he ate olives, he’d always tell me that I’d grow into them – green ones first, and then the black ones. He was completely right.

All this just goes to show that it’s important to question your culinary likes and dislikes, not just as a child but throughout your life. You could be missing out on something wonderful.

Tagged , , , , , , , ,

Recipe: Roasted fennel with lemon

Fennel is divisive; it seems to be the Marmite of the vegetable world. Personally, I love it, both for the taste and for the fact that it’s so versatile. You can eat it raw or cooked, and can use the bulb, the leaves and the seeds. Fennel bulbs lend themselves particularly well to roasting, bringing out a sweet and subtle aniseed flavour rather than the in-your-face liquorice taste that so many people seem to dislike. This year I’ve started growing my own fennel plants, and I’ve got my fingers crossed for a bumper crop later in the year.

The simple recipe below creates a sharp and sweet side dish that goes particularly well with fish. It would also work well with fatty pork or chicken, and could be roasted alongside them in the pan.

If you want some other great fennel recipes, there is a whole section on fennel in one of my favourite recipe books, Lucas Hollweg’s Good Things to Eat (affiliate link).

ROASTED FENNEL WITH LEMON

Takes: 45 minutes (5 minutes prep, 40 minutes cooking)

Makes: 4 side-dish-sized portions

Ingredients:

  • 2 fennel bulbs
  • Olive oil
  • White wine vinegar
  • Sea salt and black pepper
  • Approximately 4 tsp of fresh lemon juice

Method:

  1. Preheat oven to 200C.
  2. Remove any foliage and stalks from the fennel bulbs, as well as the white heart at the centre. Cut the fennel into large chunks and place in an oven dish.
  3. Drizzle the fennel with olive oil and a splash of white wine vinegar. Season well with sea salt and freshly ground black pepper.
  4. Roast in the preheated oven for 35 minutes, moving the fennel around the dish halfway through the cooking time.
  5. Take the dish out of the oven and squeeze the lemon juice over the fennel.
  6. Put the fennel back into the oven for 5 minutes, then serve immediately.
Tagged , , , , , , , , , ,

Recipe: Roasted vegetables

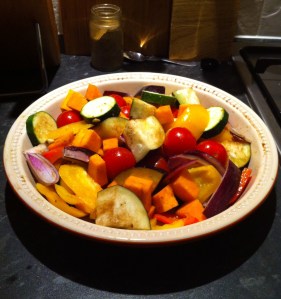
This is one of the most versatile dishes to have in your repertoire, as it’s delicious on its own or as an accompaniment to other things (see the “More Ideas” section below for some suggestions). A wide variety of vegetables lend themselves to roasting, so its a great dish for using up whatever veg you happen to have, as well as making it adaptable to what’s in season. The recipe below is my favourite combination, but there are hundreds of different combinations to try. The veg needn’t be super-fresh, and you can use as many or as few types as you like, although it is nice to have a colourful variety. I tend to make a large batch in one go, both because of the ease with which you can use up the leftovers, and the fact that once you’ve got the knives out and have made a lovely vegetable-based mess, you may as well just keep chopping.

Tips

While this is a very simple recipe (if a little labour-intensive to begin with), there are a couple of tricks that will make all the difference to the end result.

  • Don’t be tempted to pile all of the vegetables into one, deep roasting tin. I’ve made this mistake too many times. The vegetables will release quite a bit of water as they cook. If they’re piled too high in the tin, the water won’t be able to evaporate and the veg at the bottom will become very soggy. As I’m not lucky enough to own a massive, shallow tin, I’ve got the best results by dividing the mixed vegetables between two shallow roasting tins or oven dishes.
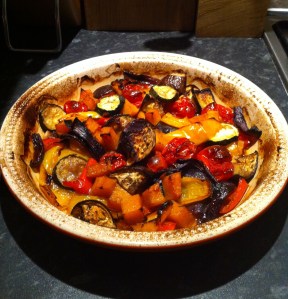
  • Use good-quality tins or dishes. By “good-quality” I don’t necessarily mean expensive or in pristine condition – mine are certainly neither of those things. It’s more about having a tin or dish with an even distribution of heat. If you look at the photos, you can see that I was actually using a pie dish. Whatever works.
  • Don’t be afraid of the vegetables getting a little bit stuck to the base and sides of the tin – it’s this light burning, or caramelisation if you want a more pleasant term for it, that gives the dish it’s delicious sweet and smoky flavour.

More ideas…

  • Roasted vegetables work especially well with lamb, particularly if it has Middle-Eastern or Mediterranean flavours. Try them with my simple, spicy marinated lamb recipe.
  • Mix into cooked couscous for a delicious filling meal that can be eaten hot or cold. Add slices of griddled halloumi to make it even more tasty.
  • Leftover veg can be reheated in a medium oven under tinfoil, and used hot or cold in wraps or sandwiches with hoummous or cream cheese.

ROASTED VEGETABLES

Takes: 25 minutes to prepare, 50 minutes to cook

Makes: Approximately 8 side-dish-sized portions

Ingredients:

  • 1 aubergine
  • 1 orange pepper
  • 1 red pepper
  • 1 yellow pepper
  • 1 sweet potato, peeled
  • 1 courgette
  • 1 red onion, peeled
  • 1 red chilli
  • 400g – 500g cherry tomatoes
  • 4 or 5 cloves of garlic
  • Olive oil
  • Balsamic vinegar
  • 2 tsp ground cumin
  • Sea salt and black pepper

Method:

  1. Preheat the oven to 200°C.
  2. Cut the aubergine, peppers and sweet potato into large chunks.
  3. Chop the courgette into thick rounds.
  4. Halve the red onion and then cut each half into quarters, so that the onion is divided into eight pieces.
  5. Roughly chop the chilli, removing the seeds if preferred.
  6. Peel the garlic and roughly chop into large pieces.
  7. Drizzle olive oil into shallow roasting tins or oven dishes (see “Tips”, above). Divide the chopped aubergine, peppers, sweet potato, courgette, onion, chilli and garlic equally between the dishes, along with the whole cherry tomatoes.
  8. Season the vegetables generously with sea salt and plenty of ground black pepper. Sprinkle the ground cumin over the vegetables, dividing it between the dishes as necessary. Add a good splash of balsamic vinegar and another drizzle of olive oil to each dish.
  9. Mix the vegetables well, preferably using your hands, until all of the pieces have a light coating of the oil, vinegar, cumin and seasoning.
  10. Roast in the preheated oven for around 50 minutes, checking them every 10-15 minutes and lightly shaking the dishes if the vegetables seem to be getting too crisp.
Tagged , , , , , ,

Recipe: Spicy marinade for barbecued, griddled or grilled lamb

This is a simple, spicy marinade for lamb steaks or chops that works best when the meat is cooked on a barbecue, a griddle pan or under a very hot grill.

Large lamb leg steaks, fresh from my favourite local butcher, are my preferred cut of lamb for this marinade, as they take on the flavours very quickly and remain tender and juicy when fast-cooked. But any lamb steaks or chops work really well here.

The first time I used this marinade, we cooked the lamb on the barbecue and it went completely black. I got very cross with my other-half for burning it, before discovering that it was actually perfectly cooked. What had blackened was the marinade and, far from spoiling the flavours, it tasted amazing against the rare lamb.

I’ve deliberately not included cooking times for the marinated lamb here, as these will depend completely on what cut of lamb you are using and how rare you want it. I generally use lamb leg steaks and cook them on a very hot griddle pan for two minutes on each side, as I like my meat rare. How you do it is completely up to you.

SPICY MARINADE FOR BARBECUED, GRIDDLED OR GRILLED LAMB

Takes: 5 minutes to prepare (plus 1hr+ marinating time)

Makes: Enough for two large lamb steaks or 3-4 lamb chops

Ingredients:

  • 1 tsp harissa paste (my favourite is by Bart Spice’s)
  • A good glug of garlic oil (or olive oil with 1 clove of crushed garlic)
  • 1 tsp ground cumin
  • 1/2 tsp ground coriander
  • Juice of 1/2 a lemon
  • Pinch of sea salt
  • Approximately 1 tsp ground black pepper, to taste

Method:

  1. Add all of the ingredients to a large bowl and mix well.
  2. Place the lamb steaks or chops into the bowl and rub the marinade into the meat with your hands.
  3. Cover the bowl and place in the fridge to marinate for at least an hour, preferably longer.
  4. Take the bowl out the fridge at least an hour before cooking to allow the lamb to warm up slightly.
  5. When you want to cook, lift the lamb out of the bowl, allowing any excess marinade to drip off.
Tagged , , , , , , , ,

Recipe link: Peppered mushroom and stilton pie

This delicious vegetarian pie recipe was created by Simon Rimmer for the BBC show Something for the Weekend.

I originally came across this recipe when I was searching for a vegetarian pie option to serve my dad during a family visit, as I was making a chicken and leek pie for the rest of us and didn’t want him to feel left out. As it turned out, this recipe was so tasty that the chicken pie was left largely uneaten, and my dad had to fend off people trying to steal his lunch. Since then, this has been a go-to recipe for when I’m feeding a crowd.

It’s certainly not one for people who dislike strong flavours, and obviously not for people who dislike blue cheese! Reading the recipe, a couple of ingredients might strike you as distinctly unusual for a pie, namely green peppercorns and soy sauce. Bear with it though; these substitutes for traditional salt and pepper are what make it such a standout dish. The soy sauce adds a dark richness to the dish, and the peppercorns add a spicy sharpness which works in perfect contrast to the mushrooms and Stilton. Don’t be tempted to season using salt and black pepper as well, no matter how unnatural it might seem – it would be too much of a good thing.

I’ve made a few alterations to the recipe in the years that I’ve been making it:

  • I use puff pastry as a topping instead of the shortcrust in the original recipe, largely because I like it better. I’m a bit lazy when it comes to pastry-making, so I almost always use shop-bought ready-to-roll puff pastry. Obviously it’s up to you what pastry you use – I think it could work equally well with puff, shortcrust or filo.
  • I always make this pie in one large dish rather than as individual portions. For one thing, it’s easier, and for another, there’s something wonderfully comforting about setting a big homemade pie down in the middle of a table and having everyone help themselves.
  • I’ve recently started grinding the green peppercorns using a pestle and mortar before adding them to pan, as I found that leaving them whole wasn’t to everyone’s taste. Grinding them creates a more even flavour distribution and a smoother consistency, although it does remove some of the excitement of biting into a whole peppercorn!
Tagged , , , , , , , , ,

Recipe: Flat mushrooms stuffed with garlic and herb soft cheese

There’s something about mushrooms that’s just so exciting. They seem to hover on the line between plant and animal, managing to be satisfyingly meaty but still undeniably earthy. This is one of my favourite ways to cook them, adapted from a dish that my mother often made when I was young. They’re quick, simple and incredibly moreish, with a crunchy breadcrumb topping that contrasts beautifully with creamy cheese filling and a firm, fresh mushroom base.

These mushrooms are also very versatile, working perfectly as a starter with a side-salad (the flavours go particularly well with strong leaves such as rocket or watercress) or, for a really indulgent treat, as an accompaniment to a good steak and some chunky chips. However, I usually serve them as a simple vegetarian main course with fresh bread and a selection of side-salads or green vegetables. I recently served them with roasted cherry tomatoes on the vine and a minted potato and green bean salad from BBC GoodFood, and the fresh flavours worked really well as a contrast to the rich mushrooms.

Tips

  • There’s a bit of a debate as to whether mushrooms should be washed or just wiped with a damp piece of kitchen paper – see this Guardian article for an overview. I tend to err on the side of caution and use the kitchen paper method. After all, the Mushroom Bureau have decreed that this is the way to do it, and they know their mushrooms. Then again, they also say that you should never remove the stalks, which leads me nicely on to the next tip…
  • I usually leave the stalks on mushrooms when I cook them, as I consider it a waste of perfectly good mushroom to throw them away. I have to make an exception for this dish, however, as removing the stalks creates the space needed for the filling.
  • Try to use the freshest mushrooms that you can. It’s not the end of the world if they’re a bit past their best, but fresh ones are less likely to become soggy during cooking.
  • If you’re watching your calorie intake, it’s easy to swap full-fat soft cheese for a low-fat version.

FLAT MUSHROOMS STUFFED WITH GARLIC AND HERB SOFT CHEESE

Takes: 10 minutes to prepare, 20-25 minutes to cook

Makes: 4 portions

Ingredients:

  • 4 large or 6 medium-sized flat mushrooms
  • 150g of garlic and herb soft cheese (I generally use Boursin)
  • 100g white breadcrumbs
  • A generous handful of flat-leaf parsley leaves, roughly chopped
  • Olive oil
  • Sea salt and black pepper

Method:

  1. Preheat oven to 180°C.
  2. Clean the mushrooms and remove as much of the stalk as possible from each one.
  3. Place the mushrooms in an ovenproof dish and press a generous spoonful of the garlic and herb cheese into the cup of each mushroom.
  4. In a bowl, mix the breadcrumbs with the chopped parsley, a good pinch of sea salt and a generous grind of black pepper.
  5. Top each mushroom with some of the breadcrumb mixture, pressing it down gently. Drizzle generously with olive oil.
  6. Bake in the preheated oven for 20-25 minutes, until the breadcrumbs are crisp and golden.
Tagged , , , , , ,

Recipe: Garlicky cherry tomato and feta salad

This side salad is incredibly simple and really delicious. It’s a variation on a classic tomato, mozzarella and basil salad, with a subtle base of flavour provided by one of my favourite ingredients, garlic oil. I love feta cheese and will apply it liberally to Mediterranean dishes whenever possible. Here, it adds a sharp, salty note to the salad; one that is complimented by the freshness of the basil and spring onions. Serve as an accompaniment to barbecued meat or vegetables, other salads, or just on its own with crusty bread.

Tips

  • Garlic oil is an incredibly useful and versatile ingredient to have in your storecupboard. It’s available from many supermarkets and delis, and is great as a dressing, as a dip for bread or a as cooking oil when you don’t feel like peeling some garlic cloves.
  • If you’re not as much of a garlic fan as I am, just replace the garlic oil with a good-quality extra-virgin olive oil.
  • My grill takes forever to heat up, so if I’m in a hurry or feeling particularly lazy, I cook the tomatoes using the grill setting on our microwave. Many cooks seem to regard putting anything in the microwave as some kind of culinary sacrilege, and I’ll be the first to admit that it doesn’t yield quite the same results as a proper grill, but it’s still surprisingly effective.
  • I prefer quite a ‘liquid’ result to this salad, as it’s great for mopping up with bread, but if you’d prefer a drier dish, just drain off more of the oil, vinegar and tomato juices. The liquid that you drain off makes a great dip for crusty bread.

GARLICKY CHERRY TOMATO AND FETA SALAD

Takes: 15 – 20 minutes

Makes: Approximately 8 side-dish-sized portions

Ingredients:

  • 450 – 500g cherry tomatoes, halved
  • 1 block of feta cheese (I like Cypressa)
  • 1 bunch of spring onions
  • Garlic oil
  • Balsamic vinegar
  • Large handful of fresh basil leaves
  • Sea salt and black pepper

Method:

  1. Preheat the grill to full temperature.
  2. Halve the cherry tomatoes and place each half skin-side-down in an ovenproof dish or baking tin.
  3. Drizzle the tomatoes with the garlic oil and a splash of balsamic vinegar, then season generously with ground black pepper. Sprinkle on a little bit of sea salt – you won’t need much because of the saltiness of the feta.
  4. Grill the tomatoes for 5 to 10 minutes, until they have softened and are starting to brown.
  5. While the tomatoes are cooking, prepare the rest of the ingredients. Chop the spring onions into thin circles.  Chop or tear the basil leaves into large pieces. Cut or crumble the feta into largish chunks (1cm x 1.5cm is a rough benchmark, but it really needn’t be exact).
  6. When the tomatoes are cooked, transfer them to a large, shallow serving dish, draining off some of the oil, vinegar and tomato juices, but retaining the majority of the liquid.
  7. Mix in the spring onions, basil and feta, and serve warm.
Tagged , , , , ,

Recipe: Chocolate refrigerator cake

It seems fitting that the first recipe on this blog should be one of the first things that I ever learned to cook. Actually, ‘cook’ isn’t quite the right word, as this doesn’t require any cooking at all, apart from melting some chocolate and butter.

I only recently learned that this cake is known by another name. I took some along to a friend’s house party and was told that it was “great tiffin”. I think my response was “Pardon?” I don’t really mind what people call it, but to me it will always be “chocolate refrigerator cake”. It was a firm favourite in our house when I was growing up, and my sisters and I often used to make it with our mum.

The simplicity, potential for mess-making and enjoyable amount of biscuit-bashing make this a perfect recipe for children (or childish adults) to make.

Tips

  • You can use other ingredients in addition to or instead of raisins or sultanas. Some suggestions are: dried apricots, dried cherries, dried cranberries, fudge, hazelnuts, honeycomb, marshmallows, pecans, walnuts…the list goes on.
  • If you fancy varying the recipe, use another type of biscuit in addition to or instead of the digestives. Ginger biscuits and shortbread both work well.
  • If you’ve got a cheap spoon to spare, bend it so that the ‘bowl’ of the spoon is at right angles to the handle. It makes an excellent tool for pressing mixtures into the corners of containers.
  • If you haven’t got time to leave the cake on the side to warm up before cutting it, a sharp knife dipped in boiling water should do the trick.

CHOCOLATE REFRIGERATOR CAKE

Takes: 25 minutes to prepare, 3+ hours chilling time

Makes: 20-25 pieces

Ingredients:

  • 400g packet of digestive biscuits
  • 100g raisins or sultanas
  • 200g good-quality chocolate (plain, milk or a mixture of the two), broken into chunks
  • 175g unsalted butter
  • 3 tbsp golden syrup

Method:

  1. Line a shallow tin (roughly 20x20cm, or the rectangular equivalent) with one or two layers of cling-film, letting it overhang the edges slightly.
  2. Crush the biscuits by sealing them in a strong freezer bag and bashing with a rolling pin. Do not bash them into a powder – they should be in small chunks. Place the crushed biscuits in a large mixing bowl and break up any remaining large pieces with your fingers.
  3. Add the raisins/sultanas to the bowl.
  4. Melt the chocolate, butter and syrup in a heatproof bowl over a pan of boiling water. Alternatively, melt the chocolate and butter in the microwave on a low heat, stirring occasionally, and then mix in the syrup.
  5. Pour the chocolate mixture over the biscuit and raisin mixture, and mix well.
  6. Put the mixture into the pre-lined tin. Level the top and press down very firmly with the back of a spoon, making sure that the mixture gets into the corners.
  7. Cover the tin with clingfilm and put into the fridge for at least 3 hours, preferably overnight.
  8. When the cake is fully chilled, remove the tin from the fridge and leave it on the side to warm up for 30 minutes to an hour.
  9. Turn the cake out onto a chopping board and peel away the cling-film, then cut the cake into pieces using a sharp knife.
  10. Store in a sealed container in the fridge.
Tagged , , , , , ,